
 Search
My first LED Build as it happens
5 posters
South East Queensland Marine Aquarium and Ocean activities Forum :: SEQMAOAF :: Marine aquarium discusion.
Page 1 of 1

My first LED Build as it happens
![]() redsoxbill 10th December 2011, 11:54 pm
redsoxbill 10th December 2011, 11:54 pm
First DIY LED Build
First let me state that I want to start this thread, with the hope that it will help someone else take the LED plunge. This will be an ongoing thread until I complete the build, and or modify it to get it just like I want. I will post pictures diagrams, and lessons learned as the process goes on.
I have been investigating, getting info together, and saving to make my first DIY LED build as well made as possible. I have had in mind what I want for about two weeks, and have waited for black Friday to see if I could get any deals.
DAY 1 (Black Friday)
Went online to Rapid LED Home Page to purchase the majority of the components initially needed to perform the build. Things purchased today:
2-5.9" x 16" Aluminum Heat Sink
28-CREE XP-E Royal Blue 3W LED with 80 degree Black Lens
20-CREE XP-G R5 Cool White 3W LED with 80 degree Black Lens
1-4 Hook Wire Hanging Kit
1-Arctic Alumina Thermal Adhesive
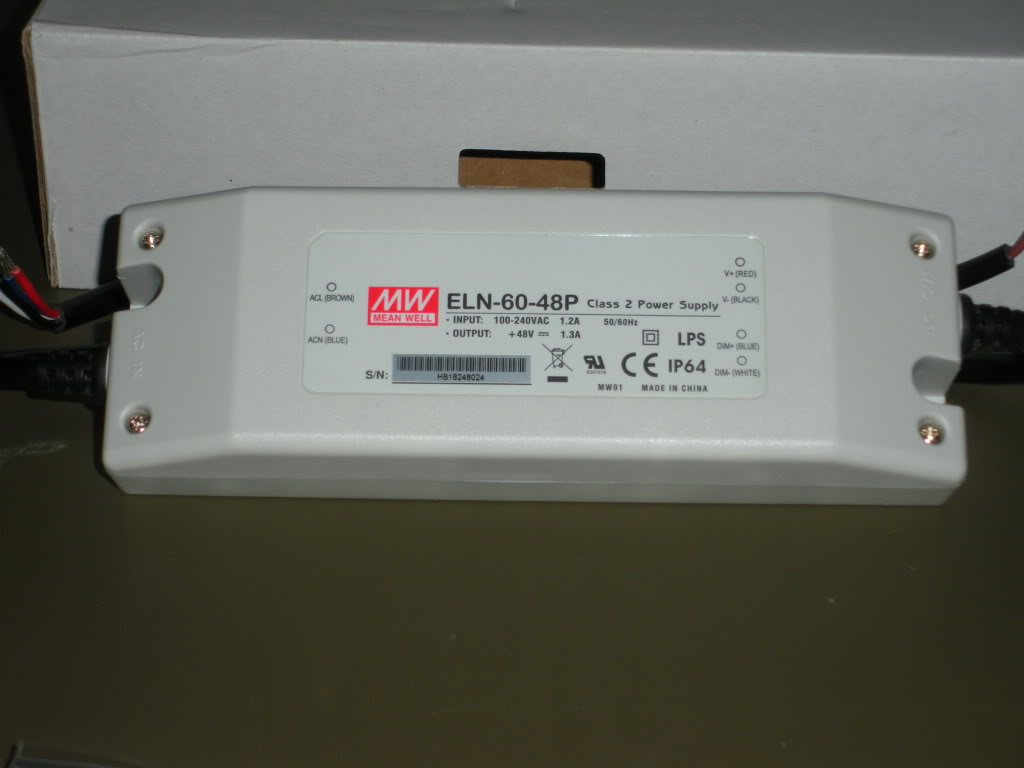
4-Mean Well ELN-60-48P dimmable driver
Also Went on to www.bostled.com to purchase a light controller kit.
1-Typhon LED Controller Kit
Items I already have a soldering iron, and a solder, remaining items to acquire prior to start of build:
1-Enclosure for LED Controller
4-Fans – Probably Computer fans with low Decibel ratings (Fans on Rapid LED had to high a decibel rating for my taste)
1-Wire 22awg tinned stranded copper
Attached is my proposed layout (sketch)

4 Required


Day 2
Built acrylic tank body, need to cut out the top, and place the overflow and area for the EcoTech MP40 http://ecotechmarine.com/products/vortech/vortech-mp40/(Future Purchase)
Tank is 35"x35"x14" or 89cm x 89cm x 29cm +/- or 56 gallons

Day 6
Got home today, and received a delivery from BoostLED. Typhon LED Controller Kit arrived. I wanted to give an attaboy for the way they packaged the kit, very well protected. See Pictures Below: First are its contents, and Second is the powered up led controller kit.


Also got an email from RapidLED saying they have shipped my LEDs.
Day 8
Started working with a local fellow reefer who has some programming skills, and we are going to attempt to program the BootsLED typhoon controller (Aurdino) with the following functions (very ambitious list)
• Ability to set max brightness of white and blue LEDS separately (this will help with acclimation of new corals)
• Ability to set sunrise start and duration
• Ability to set sunset start and duration
• Ability to set the fuge tank to turn on/off on a reverse cycle
• Moon - Built-in programming of moon cycles
• Dim the lights in total intensity (control knob)
• Have the color temperature (Kelvin rating) of the tank vary slightly throughout the day
• A preset setting that would allow me to simulate a 20K spectrum to take photographs
• A lightning storm
• Fan controllers based on heatsink temperature or timed similar to the lighting cycle.
• I am also toying with the idea for adding a separate 2 or 3 LED module in the ultra violet or "Black light effect" to show off the colors. This will probably be utilized under a separate driver, and probably be a on/off with no controlling needed.
First let me state that I want to start this thread, with the hope that it will help someone else take the LED plunge. This will be an ongoing thread until I complete the build, and or modify it to get it just like I want. I will post pictures diagrams, and lessons learned as the process goes on.
I have been investigating, getting info together, and saving to make my first DIY LED build as well made as possible. I have had in mind what I want for about two weeks, and have waited for black Friday to see if I could get any deals.
DAY 1 (Black Friday)
Went online to Rapid LED Home Page to purchase the majority of the components initially needed to perform the build. Things purchased today:
2-5.9" x 16" Aluminum Heat Sink
28-CREE XP-E Royal Blue 3W LED with 80 degree Black Lens
20-CREE XP-G R5 Cool White 3W LED with 80 degree Black Lens
1-4 Hook Wire Hanging Kit
1-Arctic Alumina Thermal Adhesive
4-Mean Well ELN-60-48P dimmable driver
Also Went on to www.bostled.com to purchase a light controller kit.
1-Typhon LED Controller Kit
Items I already have a soldering iron, and a solder, remaining items to acquire prior to start of build:
1-Enclosure for LED Controller
4-Fans – Probably Computer fans with low Decibel ratings (Fans on Rapid LED had to high a decibel rating for my taste)
1-Wire 22awg tinned stranded copper
Attached is my proposed layout (sketch)
4 Required
Day 2
Built acrylic tank body, need to cut out the top, and place the overflow and area for the EcoTech MP40 http://ecotechmarine.com/products/vortech/vortech-mp40/(Future Purchase)
Tank is 35"x35"x14" or 89cm x 89cm x 29cm +/- or 56 gallons
Day 6
Got home today, and received a delivery from BoostLED. Typhon LED Controller Kit arrived. I wanted to give an attaboy for the way they packaged the kit, very well protected. See Pictures Below: First are its contents, and Second is the powered up led controller kit.
Also got an email from RapidLED saying they have shipped my LEDs.
Day 8
Started working with a local fellow reefer who has some programming skills, and we are going to attempt to program the BootsLED typhoon controller (Aurdino) with the following functions (very ambitious list)
• Ability to set max brightness of white and blue LEDS separately (this will help with acclimation of new corals)
• Ability to set sunrise start and duration
• Ability to set sunset start and duration
• Ability to set the fuge tank to turn on/off on a reverse cycle
• Moon - Built-in programming of moon cycles
• Dim the lights in total intensity (control knob)
• Have the color temperature (Kelvin rating) of the tank vary slightly throughout the day
• A preset setting that would allow me to simulate a 20K spectrum to take photographs
• A lightning storm
• Fan controllers based on heatsink temperature or timed similar to the lighting cycle.
• I am also toying with the idea for adding a separate 2 or 3 LED module in the ultra violet or "Black light effect" to show off the colors. This will probably be utilized under a separate driver, and probably be a on/off with no controlling needed.
redsoxbill- Posts : 26
Join date : 2010-01-31
Re: My first LED Build as it happens
![]() liquidg 11th December 2011, 6:23 am
liquidg 11th December 2011, 6:23 am
Hey Bill,sounds good mate,do you want a sticky to keep it at the top,i know i would find your build interesting as i think others may and its easier if it stays at the top until you are finished? 
How much were your xp diodes?
How much were your xp diodes?
_________________
Forum Admin
liquidg- Posts : 2779
Join date : 2010-02-02
Location : Brisbane bayside
Re: My first LED Build as it happens
![]() redsoxbill 11th December 2011, 3:53 pm
redsoxbill 11th December 2011, 3:53 pm
I would like for it to stay at the top at least till it is completed. And the diodes were $3.54 each US dollars.
redsoxbill- Posts : 26
Join date : 2010-01-31
Re: My first LED Build as it happens
![]() finfan 12th December 2011, 9:29 am
finfan 12th December 2011, 9:29 am
Now this will be good - I like your design and layout - much thought has obviously gone into it...
I hope the end result is as you antisipate.....
Any chance of a running $$$ count - should come out very economical - depending your own labour rates.....
Looking forward to your progress mate - good luck

I hope the end result is as you antisipate.....
Any chance of a running $$$ count - should come out very economical - depending your own labour rates.....
Looking forward to your progress mate - good luck
finfan- Posts : 703
Join date : 2011-08-30
Location : Brisbane QLD Ausralia
Week 3
![]() redsoxbill 20th December 2011, 4:01 am
redsoxbill 20th December 2011, 4:01 am
Got my LED’s during the past week, and all arrived well and secure. Total contents include the following:
28 - CREE XP-E Royal Blue 3W LED’s
20 - CREE XP-G R5 Cool White 3W LED‘s
48 - 80 degree Black Lens
1-4 Hook Wire Hanging Kit
1-Arctic Alumina Thermal Adhesive
4-Mean Well ELN-60-48P dimmable driver

Overall order

28 CREE Royal Blue LED's

20 Cool White LED's

48 80 degree lens
LED Drivers

Heatsink

Royal Blue being tested.
After discussions with several people and seeing several DIY Builds over the past week I have changed my mind, and decided to use Thermal Tape Pre-formed 20mm Star - 6 Pack. http://www.ledgroupbuy.com/thermal-tape-preform-20mm-star-6-pack-0-55ea/ This will allow me to remove the LEDs in the future should one fail or if I need to change the light pattern due to it being too blue or too white. While I was at it I ordered a spool of pre-tinned 22 gage wire. http://www.ledgroupbuy.com/wire-22awg-tinned-stranded-copper-600-volt-20-feet/
I am still waiting for it to arrive, but should be here any day now. I also made up my mind concerning the Fans I am going to use for this build. I want this fixture to be as quiet as possible, so I looked at the fans with the lowest decibel rating, and still economical. I choose to get 4 fans from tiger direct that had a noise level of only 19 decibels which is less than a whisper. http://www.tigerdirect.com/applications/SearchTools/item-details.asp?EdpNo=4675265&CatId=802
These are Christmas presents from my wife, she needed something to put under the tree.
The running total so far for all of the materials is approximately $425.00 US dollars or about $427.50 Australian Dollar (did not know your currency was as bad as ours.)
I have the week off after Christmas, so I am planning on working on this build with a little more action. I will keep you all posted as this build continues.
I wanted to let you see one of my starfish that emgerged from under a rock while I was taking pictures of the LED components.
https://2img.net/h/i188.photobucket.com/albums/z306/redsoxbill/DSCN0375.jpg
CHEERS - Merry Christmas!!
28 - CREE XP-E Royal Blue 3W LED’s
20 - CREE XP-G R5 Cool White 3W LED‘s
48 - 80 degree Black Lens
1-4 Hook Wire Hanging Kit
1-Arctic Alumina Thermal Adhesive
4-Mean Well ELN-60-48P dimmable driver
Overall order
28 CREE Royal Blue LED's
20 Cool White LED's
48 80 degree lens
LED Drivers
Heatsink
Royal Blue being tested.
After discussions with several people and seeing several DIY Builds over the past week I have changed my mind, and decided to use Thermal Tape Pre-formed 20mm Star - 6 Pack. http://www.ledgroupbuy.com/thermal-tape-preform-20mm-star-6-pack-0-55ea/ This will allow me to remove the LEDs in the future should one fail or if I need to change the light pattern due to it being too blue or too white. While I was at it I ordered a spool of pre-tinned 22 gage wire. http://www.ledgroupbuy.com/wire-22awg-tinned-stranded-copper-600-volt-20-feet/
I am still waiting for it to arrive, but should be here any day now. I also made up my mind concerning the Fans I am going to use for this build. I want this fixture to be as quiet as possible, so I looked at the fans with the lowest decibel rating, and still economical. I choose to get 4 fans from tiger direct that had a noise level of only 19 decibels which is less than a whisper. http://www.tigerdirect.com/applications/SearchTools/item-details.asp?EdpNo=4675265&CatId=802
These are Christmas presents from my wife, she needed something to put under the tree.
The running total so far for all of the materials is approximately $425.00 US dollars or about $427.50 Australian Dollar (did not know your currency was as bad as ours.)
I have the week off after Christmas, so I am planning on working on this build with a little more action. I will keep you all posted as this build continues.
I wanted to let you see one of my starfish that emgerged from under a rock while I was taking pictures of the LED components.
https://2img.net/h/i188.photobucket.com/albums/z306/redsoxbill/DSCN0375.jpg
CHEERS - Merry Christmas!!
redsoxbill- Posts : 26
Join date : 2010-01-31
Re: My first LED Build as it happens
![]() liquidg 20th December 2011, 8:21 am
liquidg 20th December 2011, 8:21 am
Excellent thread so far Bill,worth a sticky for sure.
Mate what’s the rating when comparing the R4 with the R5 you got in the xp range?
What’s the difference between them?
Your brittle star reminds me of an accidental collection of a little brittle star many years ago at a very diverse reef out off Brisbane.
I scooped some shell grit to catch a juvenile coris gaimard as it had dived into the sand to avoid capture, to catch them when they do that, if you see them dive for cover, you just scoop the sand they went into, any way there ended up a tiny ordinary brown brittle star in the container I put over the wrasse in the net, so it came up with me as well when I was finished, I was on hookah at the time with one of the commercial guys I worked with.
Until I was in the boat and sorting out my catch I had forgotten that red shows as brown below certain depths and so from a dogy looking brittle star I was to lazy to take out of the container, came a beautiful red and white banded little guy.
I had it for years until it was harming the fish when it had gotten very large!
Cool creature the brittle sea stars, nice healthy coralline in the tank Bill
_________________
Forum Admin
liquidg- Posts : 2779
Join date : 2010-02-02
Location : Brisbane bayside
Re: My first LED Build as it happens
![]() finfan 24th January 2012, 2:11 pm
finfan 24th January 2012, 2:11 pm
Any updates here mate
Very keen to see your progress to date.....
Very keen to see your progress to date.....
finfan- Posts : 703
Join date : 2011-08-30
Location : Brisbane QLD Ausralia
Re: My first LED Build as it happens
![]() finfan 26th February 2012, 3:32 am
finfan 26th February 2012, 3:32 am
Mate what’s the rating when comparing the R4 with the R5 you got in the xp range?
What’s the difference between them
Here is some data on the 3 main CREE models. The XR-E Q5 CW, the XP-G R5 CW, and the XM-L T6 Cool White
The new models use less power but put out more light. In the long run, they will be cheaper than the older models.
As more amperage is used, there is less and less light given out by the older CREE models. The XR-E Q5 at 1 amp puts out only 67% of what the XP-G CW would at 1amp and only 60% of what the XM-L CW. That means you have to use almost twice the number of XR-E CW to match an XM-L cool white. This is not taking into consideration how much voltage you have to pump into that little XR-E just to get 60% of the XM-L light.
As the amperage goes up, the XR-E uses much more voltage than the XP-G and XM-L. At 1 amp, the XR-E uses 3.7v which is 10% more than the XP-G and a whopping 23% more than the XM-L. That means if you have a 48V driver running at 1mp you can only put 12 XR-E CW or 14 XP-G CW or 16 XM-L CW. That means for the same cost of powering 12 XR-E CW which give you 2824.8 lumen you could be powering 16 XM-L CW which would give you 6208 lumens. See how quickly this adds up? Less power, more light, that is what LEDs are all about. This is why efficiency is so important. Every minute you have a non efficient LED wired up, it is costing you money.
Now this is just the CREE LEDs. Other non CREE LEDs are often much less efficient than the oldest CREE LED
finfan- Posts : 703
Join date : 2011-08-30
Location : Brisbane QLD Ausralia
Re: My first LED Build as it happens
![]() liquidg 26th February 2012, 7:30 am
liquidg 26th February 2012, 7:30 am
It looks like redsoxbill is not answering now so I took off the sticky,have you herd from him?
Yeh i know the old fashioned crees are not as good as the modern crees,thats a given with most anything tech related!
Do you know the actual differences in the XP R4 and R5 though,I cant find much difference at all,but I haven’t looked that much on the net,only a little, I like to speak or text to folks that have done it or used it!
One thing with the old XR-Es though,I am told their life span,if fan cooled,is far longer than the later models,maybe that’s why they don’t offer XRs in the non fan cooled lighting models.
I will have to see how Jasons mix of XP-Es and XM-Ls turn out,he hasnt picked them up yet,oh and as usual there is another new diode,the XT is making people talk about them as well,there is always something new around the corner.
_________________
Forum Admin
liquidg- Posts : 2779
Join date : 2010-02-02
Location : Brisbane bayside
Been Hectic - lots going on
![]() redsoxbill 26th February 2012, 3:51 pm
redsoxbill 26th February 2012, 3:51 pm
Sorry for the delay in getting back on the forum. lots have happened, but little with my LED build, except I have wired, and tested my first module. I am currently waiting on some electronic components to allow me to dim the lights full force. I am also building a new tank and sump to create a new frag system for my coral grow outs. I will probably start posting on this string again within the next two weeks or so.
Bill
Bill
redsoxbill- Posts : 26
Join date : 2010-01-31
Re: My first LED Build as it happens
![]() finfan 26th February 2012, 10:52 pm
finfan 26th February 2012, 10:52 pm
No -not a peep from Bill...shame I was looking forward to his progress and feed back.
As for cree - An R5 does have higher flux than an R4. It's likely, although not certainly, more efficient.
As for cree - An R5 does have higher flux than an R4. It's likely, although not certainly, more efficient.
finfan- Posts : 703
Join date : 2011-08-30
Location : Brisbane QLD Ausralia
Re: My first LED Build as it happens
![]() Zhyr 7th April 2012, 4:08 pm
Zhyr 7th April 2012, 4:08 pm
I'd be interested in hearing more about your build.
It's something I've been thinking about doing for a while.
I know we can get Cree LEDs fairly cheap online (much better than going through jaycar) and again, much better than buying a unit for 3k
It's something I've been thinking about doing for a while.
I know we can get Cree LEDs fairly cheap online (much better than going through jaycar) and again, much better than buying a unit for 3k
Zhyr- Posts : 231
Join date : 2012-04-07
Re: My first LED Build as it happens
![]() marineman 4th May 2012, 12:47 pm
marineman 4th May 2012, 12:47 pm
I hope you can post a step by step process mate im very interested.
cheers
cheers

marineman- Posts : 22
Join date : 2012-04-28
Location : sydney :(
» NEW TANK BUILD
» CJ Homes at Capalaba, should you get them to build your home?
» C J Homes at Capalaba, concreting quality for your build with them.
» Build Up Of A 1928 Ford Model A Roadster.
» 1961 Holden EK Custom Build Thread.
» CJ Homes at Capalaba, should you get them to build your home?
» C J Homes at Capalaba, concreting quality for your build with them.
» Build Up Of A 1928 Ford Model A Roadster.
» 1961 Holden EK Custom Build Thread.
South East Queensland Marine Aquarium and Ocean activities Forum :: SEQMAOAF :: Marine aquarium discusion.
Page 1 of 1
Permissions in this forum:
You cannot reply to topics in this forum|
|
|